Backup, restore, and clone the porta-switch installation with tar files
Emin Gabrielyan
Table of Contents:
Backup, restore, and clone the porta-switch installation
1.1. The underlying network and designation
2.2. Find the logical / virtual partitions of RHEL
2.3. Find the physical disk’s boot partition
2.4. Mount the boot, root1, root2, and porta paritions
2.5.1. Backup of porta partition
2.5.2. Backup of root1, root2, and boot
3. An FTP server on Windows XP
3.1. Install an FTP server under Windows
3.2. Direct routing without NAT
4.1. Boot from a Live CD and configure the network
4.3. Create file systems, format, and assign labels to partitions
4.4. Mount the empty partitions
4.5. Preparing the network for downloading the tar files
4.6. Downloading the tar files
4.6.1. Download the boot.tar.bzip2 file
4.6.2. Download the root2.tar.bzip2 file
4.6.3. Downloading the porta.tar.bzip2 file
4.9. Downloading and installing the upgrades
4.11. Restoring the network connection in the new system
4.12. Dongles of the porta-switch servers
4.12.1. The telephony services of porta-sip
5.3. Upgrade file switzegrade.tar.bzip2
5.3.2. The /etc/fstab file of the root filesystem..
1. Introduction
The porta-switch installation requires 4 servers (configurator, master, slave, and sip) and the installation from DVD must be followed by a post-install and configuration procedure carried out remotely by the porta-one support staff. Once the system is functional after such a post-install procedure, it must be backed up before any further modification is done on the system.
We already defined a backup procedure based on hard drive images [1] [2] [3]. This document presents a more flexible and portable backup and restore procedure based on tar files. It is disk size independent and takes two times less space.
1.1. The underlying network and designation
For the clarity of all notes, note that a subnet 212.147.8.104/29 consisting of 8 public IP addresses is used in our installation. The IP addresses and names are assigned as follows:
· 212.147.8.105 default gateway
· 212.147.8.106 billing1.switzernet.com, configurator
· 212.147.8.107 spare IP address, e.g. for an FTP server running on Live CD
· 212.147.8.108 billing2.switzernet.com, master (the radius server)
· 212.147.8.109 billing3.switzernet.com, slave (the web interface)
· 212.147.8.110 billing4.switzernet.com, voice (b2bua, sip, and rtp proxy server)
· 212.147.8.111 broadcast address
Note that many printouts are based on handwritten notes taken from the console and may contain misspellings. Use the notes as hints and not as literal instructions to copy and paste.
2. Backup
2.1. Boot from Live CD
Shut down all 4 servers properly. First you must shut down the SIP server, then the slave, then the master, and finally the configurator. None of these machines must be booted from a hard drive, before the backup is complete.
The backup procedure is the same for each server. Boot from a Fedora 13 Live CD [iso] or any recent Linux. Open the terminal window [Applications] [System Tools] [Terminal] and enter into a super user mode.
2.2. Find the logical / virtual partitions of RHEL
Find the 4 partitions of the RHEL installation. They must be seen similarly to the example:
$ su
# ls –l /dev/VolGroup01/
… LogVol00 -> ../dm-2
… LogVol01 -> ../dm-4
… LogVol02 -> ../dm-3
… LogVol03 -> ../dm-5
The first two partitions represent two root folders kept by porta-one for upgrades and rollbacks [4]. The 2nd one is the active root. The third contains the running porta-one products. This is the largest partition. The last forth one is for the swap space.
These were devices corresponding to logical partitions of RHEL. You must also find the device file corresponding to the entire hard disk. The name of the file depends a lot on the type of the disk controller.
2.3. Find the physical disk’s boot partition
The printout below shows the disk device file for a HP ProLiant DL120 G5 2x500GB SATA E200/128 RAID 1/5 computer [5].
$
$ ssh root@billing1.switzernet.com "echo p | fdisk /dev/cciss/c0d0"
Command (m for help):
Disk /dev/cciss/c0d0: 500.0 GB, 500074307584 bytes
255 heads, 63 sectors/track, 60797 cylinders
Units = cylinders of 16065 * 512 = 8225280 bytes
Device Boot Start End Blocks Id System
/dev/cciss/c0d0p1 * 1 13 104391 83 Linux
/dev/cciss/c0d0p2 14 60797 488247480 8e Linux LVM
Command (m for help): Command (m for help): Command (m for help):
The number of cylinders for this disk is set to 60797.
There is nothing wrong with that, but this is larger than 1024,
and could in certain setups cause problems with:
1) software that runs at boot time (e.g., old versions of LILO)
2) booting and partitioning software from other OSs
(e.g., DOS FDISK, OS/2 FDISK)
got EOF thrice - exiting..
$
Here is the disk device file for a conventional SATA controller.
$
$ ssh root@billing2.switzernet.com "echo p | fdisk /dev/sda"
Command (m for help):
Disk /dev/sda: 500.1 GB, 500107862016 bytes
255 heads, 63 sectors/track, 60801 cylinders
Units = cylinders of 16065 * 512 = 8225280 bytes
Device Boot Start End Blocks Id System
/dev/sda1 * 1 13 104391 83 Linux
/dev/sda2 14 60797 488247480 8e Linux LVM
Command (m for help): Command (m for help): Command (m for help):
The number of cylinders for this disk is set to 60801.
There is nothing wrong with that, but this is larger than 1024,
and could in certain setups cause problems with:
1) software that runs at boot time (e.g., old versions of LILO)
2) booting and partitioning software from other OSs
(e.g., DOS FDISK, OS/2 FDISK)
got EOF thrice - exiting..
$
On physical disk device files, the fdisk tool shows only two partitions. The first one is the boot partition. The 2nd one marked Linux LVM, is a logical volume. The root, swap, and the product partitions that we saw in section 2.2, are not physical disk partitions. They all are virtual partitions making part of the Linux logical volume, which appears here as the 2nd physical partition.
2.4. Mount the boot, root1, root2, and porta paritions
Mount all partitions:
# cd /mnt
# mkdir boot
# mkdir root1
# mkdir root2
# mkdir porta
# ls –l /dev/sda*
# mount /dev/sda1 boot
# ls –l /dev/VolGroup01/
# mount /dev/VolGroup01/LogVol00 root1
# mount /dev/VolGroup01/LogVol01 root2
# mount /dev/VolGroup01/LogVol02 porta
On a ProLiant server with HP E200 RAID controller, for mounting the boot you will need the following:
# cd /mnt
# mkdir boot
# ls –l /dev/cciss/
# mount /dev/cciss/c0d0p1 boot
The partition /dev/VolGroup01/LogVol03 is a swap space and must not be mounted.
The boot partition must contain not only the vmlinuz file but also an initrd file.
# cd /mnt
# ls boot /vmlinuz*
# ls boot /initrd*
Check it to make sure that you mounted the hard disk’s boot partition and not that of your live CD.
-rw-r--r-- 1 root root 65945 Sep 3 2009 config-2.6.18-164.0.0.0.1.el5
drwxr-xr-x 2 root root 1024 Aug 20 16:04 grub
-rw------- 1 root root 3418528 Aug 18 16:54 initrd-2.6.18-164.0.0.0.1.el5.img
drwx------ 2 root root 12288 Aug 18 16:48 lost+found
-rw-r--r-- 1 root root 108784 Sep 3 2009 symvers-2.6.18-164.0.0.0.1.el5.gz
-rw-r--r-- 1 root root 1226057 Sep 3 2009 System.map-2.6.18-164.0.0.0.1.el5
-rw-r--r-- 1 root root 1933532 Sep 3 2009 vmlinuz-2.6.18-164.0.0.0.1.el5
$
Check the other mounted partitions:
# ls root1
# ls root2
# ls porta
2.5. Archiving
Now start archiving the files of each partition. You must obligatorily be in the super user mode to preserve the ownership properties of files.
2.5.1. Backup of porta partition
As you run your OS from the Live CD the voluminous files must be saved in the mounted disk space. If you try to use other folders allocated in memory, you can cause memory overflow and crash the OS. First backup the porta partition using the space of root1 partition. Then move the file into the tar folder of porta partition backup everything else directly into the porta partition’s tar folder.
# cd /mnt/porta
# find . | wc –l
# tar –cvjf ../root1/porta.tar.bzip2 | awk '{print "[" NR "] " $0}'
# mkdir tar
# mv ../root1/porta.tar.bzip2 tar
2.5.2. Backup of root1, root2, and boot
Proceed with backup of root1 partition:
# cd /mnt/root1
# find . | wc –l
# tar –cvjf ../porta/tar/root1.tar.bzip2 | awk '{print "[" NR "] " $0}'
Proceed with backup of root2 partition:
# cd /mnt/root2
# find . | wc –l
# tar –cvjf ../porta/tar/root2.tar.bzip2 | awk '{print "[" NR "] " $0}'
Proceed with backup of boot partition:
# cd /mnt/boot
# find . | wc –l
# tar –cvjf ../porta/tar/boot.tar.bzip2 | awk '{print "[" NR "] " $0}'
The displaying of the number of files find . | wc -l as well as pipelining the output of tar though awk is used uniquely for displaying the number of processed files and observing the progress.
You have the entire system and can now upload the files to an FTP server.
2.6. Upload the files
2.6.1. Configure the network
You have the archive files of each of 4 partitions in /mnt/porta/tar folder. Configure the network following the example below:
# cd /mnt/porta/tar
# ifconfig eth0 212.147.8.110 netmask 255.255.255.248
# route add default gw 212.147.8.105
# echo nameserver 192.168.1.2 >> /etc/resolv.conf
# echo nameserver 208.67.220.220 >> /etc/resolv.conf
# ping google.com
2.6.2. Rename the files
Rename the files to add the timestamp and also the server type (billing1 for the configurator, billing2 for the master, billing3 for the slave, and billing4 for the SIP server). Follow the example below. Compute also the MD5 checksums for uploading them to the server.
# cd /mnt/porta/tar/
# ls
# for f in *.tar.bzip2; do mv $f 100830,1925,billing4,$f; done
# ls –l
# md5sum *.tar.bzip2
2.6.3. Uploading
Check our doc on how to setup an FTP server on a machine with an external USB disk booted from Fedora 13 Live CD [1] [2] [3]. You can setup an FTP server also on a Windows XP [6] [7] [8]. Finally you can upload directly to one of our main web servers, but it will take time.
The note below shows the commands for uploading to the FTP server in a binary mode all files of the current folder:
# cd /mnt/porta/tar
# ncftp -u toto 212.147.8.107
> cd tar
> dir
> bin
> mput *
> quit
You can now power off the machine
# poweroff
3. An FTP server on Windows XP
3.1. Install an FTP server under Windows
For an FTP server configured on a Fedora 13 Live CD follow our how-to example [1] [2] [3]. For an FTP server configured under windows XP follow the detailed instructions on the web [6] [7] [8] and an after-install hint below.
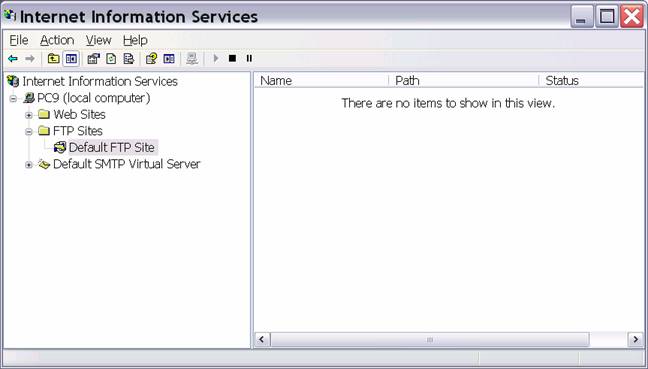
Once IIS windows component is installed and activated, register a regular windows user. Run the iis.msc panel C:\WINDOWS\system32\inetsrv\iis.msc. Open the properties of the FTP service (right click on the main area).
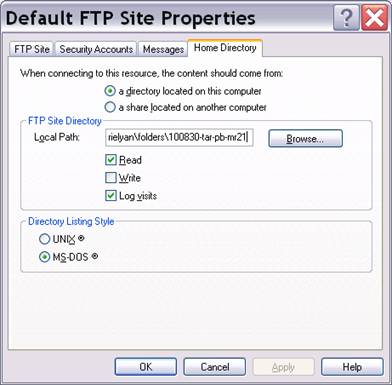
In the properties panel you can browse and assign the user (previously registered in the Windows and sync its password). In the same panel you can also specify the home directory for this user, which must be set to the folder containing the tar archives.
Note that by default this server does not accept the passive mode. On the client side you must always use the port mode. You need to deactivate the firewall for the port 21, both on the server (Windows XP) and on the client sides doe to the PORT mode (Fedora 13 Live CD).
3.2. Direct routing without NAT
An FTP server is installed on 192.168.1.17. The servers having public IP addresses cannot access the FTP server, except a direct routing is established for the subnet 212.147.8.104/29. Without such an entry, the route (from the server to client) passes via the NAT gateway making the connection impossible. Follow the example below for introducing such a direct routing under Windows:
C:\> route add 212.147.8.104 mask 255.255.255.248 192.168.1.22
C:\> route print
===========================================================================
Interface List
0x1 ........................... MS TCP Loopback interface
0x2 ...00 11 43 18 da 43 ...... Broadcom NetXtreme 57xx Gigabit Controller - Packet Scheduler Miniport
===========================================================================
===========================================================================
Active Routes:
Network Destination Netmask Gateway Interface Metric
0.0.0.0 0.0.0.0 192.168.1.1 192.168.1.17 20
127.0.0.0 255.0.0.0 127.0.0.1 127.0.0.1 1
192.168.1.0 255.255.255.0 192.168.1.17 192.168.1.17 20
192.168.1.17 255.255.255.255 127.0.0.1 127.0.0.1 20
192.168.1.255 255.255.255.255 192.168.1.17 192.168.1.17 20
212.147.8.104 255.255.255.248 192.168.1.22 192.168.1.17 1
224.0.0.0 240.0.0.0 192.168.1.17 192.168.1.17 20
255.255.255.255 255.255.255.255 192.168.1.17 192.168.1.17 1
Default Gateway: 192.168.1.1
===========================================================================
Persistent Routes:
None
C:\>
Refer to the office network architecture for more clarity [9] [10].
4. Restoring porta-switch from tar files
4.1. Boot from a Live CD and configure the network
Boot from the Fedora 13 Live CD [iso] (657MB). Select the right keyboard before login. Open a terminal [Applications] [System Tools] [Terminal]. Enter into super user mode, and configure the network as follows:
# cd /mnt/porta/tar
# ifconfig eth0 212.147.8.110 netmask 255.255.255.248
# route add default gw 212.147.8.105
# echo nameserver 192.168.1.2 >> /etc/resolv.conf
# echo nameserver 208.67.220.220 >> /etc/resolv.conf
# ping google.com
For clarity, use the IP address of the server you are going to restore. You will avoid also conflicts with the running servers. If a clone of the server, you are going to restore is still running use the spare IP 212.147.8.107, as during restoration the IP address of your Live CD OS does not really matter.
4.2. Partitioning
Run the fdisk on the main disk device. The main disk device name depends on your hardware. Examples are /dev/sda and /dev/cciss/c0d0.
Follow the notes below to delete all existing partitions. The commands to be typed are highlighted:
# fdisk /dev/cciss/c0d0
p
Device Boot Start End Blocks Id System
/dev/cciss/c0d0p1 * 1 13 104391 83 Linux
/dev/cciss/c0d0p2 14 60797 488247480 8e Linux LVM
d
1
d
p
Device Boot Start End Blocks Id System
p
Stay in fdisk. Continue by creating new partitions. We will not be using Linux Logical Volumes but ordinary primary disk partitions. A space of 2 Gigabyte will be used for boot partition (with an extra space for work), 20 Gigabyte for the root, 10 Gigabyte for swap, and the rest for the running porta-one system.
Create the first 2G partition:
n
e extended
p primary partition (1-4)
p
Partition number (1-4): 1
First cylinder (…, default 1) <return>
Last cylinder …: +2G
p
Stay in fdisk and create the second 20G partition:
n
p
2
First…: <return>
Last…: +20G
p
Stay in fdisk and create the third 10G partition:
n
p
3
First…: <return>
Last…: +10G
p
Stay in fdisk and create the last fourth partition taking the remaining space (about 450GB on the currently used disks). Type p for displaying the final allocation. The blocks are of 1K in size.
n
p
4
First…: <return>
Last…: <return>
p
Device Boot Start End Blocks Id System
/dev/cciss/c0d0p1 1 262 2104483+ 83 Linux
/dev/cciss/c0d0p2 263 2874 20980890 83 Linux
/dev/cciss/c0d0p3 2875 4180 10490445 83 Linux
/dev/cciss/c0d0p4 4181 60797 454776052+ 83 Linux
Stay in fdisk and mark the first partition as bootable:
a
1
p
Device Boot Start End Blocks Id System
/dev/cciss/c0d0p1 * 1 262 2104483+ 83 Linux
/dev/cciss/c0d0p2 263 2874 20980890 83 Linux
/dev/cciss/c0d0p3 2875 4180 10490445 83 Linux
/dev/cciss/c0d0p4 4181 60797 454776052+ 83 Linux
Stay in fdisk and change the type of the third partition from Linux to swap:
t
3
82
p
Device Boot … Blocks Id System
/dev/cciss/c0d0p1 * … 2104483+ 83 Linux
/dev/cciss/c0d0p2 … 20980890 83 Linux
/dev/cciss/c0d0p3 … 10490445 82 Linux swap / Solaris
/dev/cciss/c0d0p4 … 454776052+ 83 Linux
Write and exit
w
Reboot the computer from Live CD again. Select the keyboard type before logging. If you did not select the right keyboard at login, you can do it when logged in.
You will need to reconfigure the network again (see section 4.1). Open a terminal [Applications] [System Tools] [Terminal], enter into super user mode, and follow the example below:
# cd /mnt/porta/tar
# ifconfig eth0 212.147.8.110 netmask 255.255.255.248
# route add default gw 212.147.8.105
# echo nameserver 192.168.1.2 >> /etc/resolv.conf
# echo nameserver 208.67.220.220 >> /etc/resolv.conf
# ping google.com
Enter into fdisk check, write, and exit. No message must indicate on an error or warning.
# fdisk /dev/cciss/c0d0
p
w
4.3. Create file systems, format, and assign labels to the partitions
Follow the instructions below to format the file systems and to assign the labels. Note that the labels will be used for mounting the devices in the final system. The labels make the mounting process independent of the device file names such as /dev/cciss/c0d0p2 or /dev/cciss/sda2. Therefore many files used at boot time can become portable if labels are used.
Format the three partitions (1,2, and 4) into Linux ext3 file system format:
# mkfs –t ext3 /dev/cciss/c0d0p1
# mkfs –t ext3 /dev/cciss/c0d0p2
# mkfs –t ext3 /dev/cciss/c0d0p4
Assign the labels to all 4 partitions and format in the mean time the swap partition:
# e2label /dev/cciss/c0d0p1 switzeboot
# e2label /dev/cciss/c0d0p2 switzeroot
# mkswap –L switzeswap /dev/cciss/c0d0p3
# e2label /dev/cciss/c0d0p4 switzeporta
4.4. Mount the empty partitions
Follow the instructions below to mount all partitions except the swap one:
# cd /mnt
# mkdir boot
# mkdir root
# mkdir porta
# mount /dev/cciss/c0d0p1 boot
# mount /dev/cciss/c0d0p2 root
# mount /dev/cciss/c0d0p4 porta
#
4.5. Preparing the network for downloading the tar files
The FTP locations of files are given in section 5.1 and HTTP locations in section 5.2. If you use the Windows XP FTP server, you will not be able to use FTP in passive mode and as a consequence, you will need to enable the FTP port 21 in the firewall of your Live CD system.
Type in the terminal windows in the super user mode system-config-firewall and enable the FTP in the firewall panel.
#
# system-config-firewall
#
4.6. Downloading the tar files
You have different choices for downloading the files. Among them wget, fetch, lftp, and ncftp.
An example of a usage of lftp is shown below:
# cd /mnt/boot
#
# lftp –e "set passive off; dir data1; quit" –u toto,**** 192.168.1.17
#
# lftp –e "set passive off; get data/100830,1925,billing4,boot.tar.bzip2; quit" –u toto,**** 192.168.1.17
# ls –l
#
4.6.1. Download the boot.tar.bzip2 file
An example of downloading with ncftp is shown below. The option -E disables the passive mode (otherwise the ncftp will try 2 times and will fallback to use PORT mode instead of PASV mode automatically). Additionally, ncftp permits a use of wildcard characters. The argument ., following the IP address of the FTP server is the name of the local folder.
# cd /mnt/boot
#
# ncftp –E –u toto –p **** 192.168.1.17 . data1/*,billing4,boot.tar.bzip2
# ls
After the completion of the above command you will get the tar file of the boot partition in the root of the currently empty boot partition.
4.6.2. Download the root2.tar.bzip2 file
As you remember, the original system had two root partitions. The 2nd root partition was the one the system booted from. The 1st root partition was for a rollback. We will restore only the active root partition. In our new system we did not even consider a partition for the duplicated root. Move to the mounted root partition and download the tar files of the 2nd root partition of the original system.
# cd /mnt/root
#
# ncftp –E –u toto –p **** 192.168.1.17 . data1/*,billing4,root2.tar.bzip2
# ls
#
4.6.3. Downloading the porta.tar.bzip2 file
Similarly to the previous examples download also the tar file of the porta partition into its currently empty folder.
# cd /mnt/porta
#
# ncftp –E –u toto –p **** 192.168.1.17 . data1/*,billing4,porta.tar.bzip2
# ls
#
4.7. Restoring the files
The following commands are sufficient for extracting all files into their corresponding partitions.
# cd /mnt/boot
# tar –xvjf 100830,1925,billing4,boot.tar.bzip2
# cd ../root
# tar –xvjf 100830,1925,billing4,root2.tar.bzip2
# cd ../porta
# tar –xvjf 100830,1925,billing4,porta.tar.bzip2
#
4.8. Installing a boot loader
Follow the instructions below to install the grub boot loader on the hard drive:
# cd /mnt/boot
# grub-install –root-directory=/mnt/boot /dev/cciss/c0d0
# grub-install –root-directory=/mnt/boot /dev/cciss/c0d0p1
The device filenames must obviously correspond to your machine. For example your commands may look as follows on another computer:
# cd /mnt/boot
# grub-install –root-directory=/mnt/boot /dev/sda
# grub-install –root-directory=/mnt/boot /dev/sda1
Install the boot loader sector natively from the grub console:
# cd /mnt/boot
# grub
grub> root
grub> root (hd0,0)
grub> find /grub/stage1
find /grub/stage1
(hd0,0)
grub> setup (hd0,0)
grub> setup (hd0)
grub> quit
#
4.9. Downloading and installing our compatibility upgrade
Download from any FTP or HTTP locations (sections 5.1 and 5.2) the switzegrade.tar.bzip2 file into the root of the hard drive’s boot partition.
# cd /mnt/boot
# ncftp –E –u toto –p **** 192.168.1.17 . data1/switzegrade.tar.bzip2
Return to the /mnt folder and extract the upgrade file into the boot and root partitions. You will see the list of files being added or updated. Note that the partitions are obviously expected to be mounted under the correct names (boot and root), otherwise the upgrade will fail.
# cd /mnt/
# tar –xvjf boot/switzegrade.tar.bzip2
#
Enforce the following hard links:
# cd /mnt/
# ln –f boot/grub/grub.conf boot/grub/grub.cfg
# ln –f boot/grub/grub.conf boot/grub/menu.lst
# ln –f boot/grub/grub.conf boot/boot/grub/grub.conf
# ln –f boot/grub/grub.conf boot/boot/grub/grub.cfg
# ln –f boot/grub/grub.conf boot/boot/grub/menu.lst
4.10. Reboot the system
Reboot the system from the hard drive. Remove the CD.
# cd /mnt/
# umount boot
# umount root
# umount porta
# reboot
4.11. Restoring the network connection in the new system
If your system rebooted from the hard drive successfully you deserve a big fat congratulation!
It remains you to make an order with the network interface if it did not come up at the boot time, which is unlikely if the machine is changed.
Login as root into the restored system and go to the folder where the system keeps the data on its network interfaces. You will need to replace the content of the current ifcfg-eth0 file the by the data stored in the original file ifcfg-eth0.bak. The original file was renamed to .bak at the boot time, as the MAC address detected on the NIC did not match the MAC address written in the file (because the computer is changed). You must restore all content of the .bak file back into the ifcfg-eth0 file, except that this time you need to keep the right MAC address appearing in ifcfg-eth0.
Login: root
Password: ****
# cd /etc/sysconfig/network-scripts/
# ls ifcfg-eth0*
/etc/sysconfig/network-scripts/ifcfg-eth0
/etc/sysconfig/network-scripts/ifcfg-eth0.bak
# vi ifcfg-eth0
: r ifcfg-eth0.bak
Below is an example of an ifcfg-eth0 file:
# Broadcom Corporation NetXtreme BCM5722 Gigabit Ethernet PCI Express
DEVICE=eth0
BOOTPROTO=static
BROADCAST=212.147.8.111
HWADDR=00:21:5a:dd:8d:94
IPADDR=212.147.8.106
IPV6INIT=yes
IPV6_AUTOCONF=yes
NETMASK=255.255.255.248
NETWORK=212.147.8.104
ONBOOT=yes
Reboot the server again and this time the network interface must come up normally.
4.12. Dongles of porta-switch servers
During the restoration you may need to shuffle or use new computers. We have 2 dongles. One of them must be plugged on the master (billing2.switzernet.com) and another one on the sip server (billing4.switzernet.com). The configurator and the slave web server do not need a dongle.
4.12.1. The telephony services of porta-sip
If at the boot time the sip server (billing4.switzernet.com) did not start the SIP, proxy, or b2bua services, enter as root and stop all telephony services, using the /porta_var/sipenv-212.147.8.110/etc/rc.d/sip.sh utility.
$
$ ssh root@billing4.switzernet.com "/porta_var/sipenv-212.147.8.110/etc/rc.d/sip.sh status"
Virtual PortaSIP server [212.147.8.110] is UP.
registrar statistics: 0 registered location(s).
b2bua statistics: 0 call(s) in progress.
$
If all services come up normally after you start them, stop the telephony services again, and reboot the machine. It must now boot normally by bringing up all telephony services. Login into slave and get a confirmation in the SIP environments section.
5. Files
5.1. FTP locations
A temporary office FTP server is running under the following location. The server does not support passive mode. You need to enable the FTP in the firewall of the client.
$ ftp 192.168.1.17
Connected to 192.168.1.17.
220 Microsoft FTP Service
Name: toto
331 Password required for toto.
Password:
230 User toto logged in.
Remote system type is Windows_NT.
ftp>
ftp> dir data1
200 PORT command successful.
150 Opening ASCII mode data connection for /bin/ls.
08-27-10 08:40PM 5809944 100829,2000,billing1,boot.tar.bzip2
08-26-10 10:07PM 617833923 100829,2000,billing1,porta.tar.bzip2
08-26-10 09:27PM 567890331 100829,2000,billing1,root1.tar.bzip2
08-26-10 09:43PM 576437989 100829,2000,billing1,root2.tar.bzip2
08-30-10 10:51PM 5809434 100830,1845,billing3,boot.tar.bzip2
08-30-10 10:51PM 624991413 100830,1845,billing3,porta.tar.bzip2
08-30-10 10:52PM 569147738 100830,1845,billing3,root1.tar.bzip2
08-30-10 10:52PM 578991246 100830,1845,billing3,root2.tar.bzip2
08-30-10 11:27PM 5787581 100830,1925,billing4,boot.tar.bzip2
08-30-10 11:27PM 3826157 100830,1925,billing4,porta.tar.bzip2
08-30-10 11:27PM 552913171 100830,1925,billing4,root1.tar.bzip2
08-30-10 11:28PM 576843940 100830,1925,billing4,root2.tar.bzip2
08-31-10 01:39AM 5807171 100830,2130,billing2,boot.tar.bzip2
08-31-10 01:39AM 11315019 100830,2130,billing2,porta.tar.bzip2
08-31-10 01:39AM 553421884 100830,2130,billing2,root1.tar.bzip2
08-31-10 01:40AM 579733447 100830,2130,billing2,root2.tar.bzip2
09-02-10 01:05AM 2785 md5.txt
09-02-10 01:03AM 3453142 switzegrade.tar.bzip2
226 Transfer complete.
ftp>
ftp> quit
221
The tar files are available also via FRP on one of hosted web servers:
ftp://unappel.ch/htdocs/2/company/100830-tar-pb-mr21/data1/
$ ftp unappel.ch
Connected to unappel.ch.
220 anaconda05 Ready.
Name: unappel
331 Password required for unappel
Password:
230 User unappel logged in.
Remote system type is UNIX.
Using binary mode to transfer files.
ftp> cd /htdocs/2/company/100830-tar-pb-mr21/data1
250 CWD command successful
ftp> dir
200 PORT command successful
150 Opening ASCII mode data connection for file list
drwxr-xr-x 2 .. 4096 Sep 1 23:04 .
drwxr-xr-x 3 .. 4096 Aug 30 12:24 ..
-rw-r--r-- 1 .. 5809944 Aug 30 12:25 100829,2000,billing1,boot.tar.bzip2
-rw-r--r-- 1 .. 617833923 Aug 30 14:16 100829,2000,billing1,porta.tar.bzip2
-rw-r--r-- 1 .. 567890331 Aug 30 15:59 100829,2000,billing1,root1.tar.bzip2
-rw-r--r-- 1 .. 576437989 Aug 30 17:38 100829,2000,billing1,root2.tar.bzip2
-rw-r--r-- 1 .. 5809434 Aug 30 17:51 100830,1845,billing3,boot.tar.bzip2
-rw-r--r-- 1 .. 624991413 Aug 30 23:14 100830,1845,billing3,porta.tar.bzip2
-rw-r--r-- 1 .. 569147738 Aug 31 05:14 100830,1845,billing3,root1.tar.bzip2
-rw-r--r-- 1 .. 578991246 Aug 31 14:05 100830,1845,billing3,root2.tar.bzip2
-rw-r--r-- 1 .. 5787581 Aug 30 17:55 100830,1925,billing4,boot.tar.bzip2
-rw-r--r-- 1 .. 3826157 Aug 30 17:56 100830,1925,billing4,porta.tar.bzip2
-rw-r--r-- 1 .. 552913171 Aug 30 22:54 100830,1925,billing4,root1.tar.bzip2
-rw-r--r-- 1 .. 576843940 Aug 31 04:59 100830,1925,billing4,root2.tar.bzip2
-rw-r--r-- 1 .. 5807171 Aug 30 19:52 100830,2130,billing2,boot.tar.bzip2
-rw-r--r-- 1 .. 11315019 Aug 30 19:59 100830,2130,billing2,porta.tar.bzip2
-rw-r--r-- 1 .. 553421884 Aug 31 01:52 100830,2130,billing2,root1.tar.bzip2
-rw-r--r-- 1 .. 579733447 Aug 31 07:21 100830,2130,billing2,root2.tar.bzip2
-rw-r--r-- 1 .. 2785 Sep 1 23:09 md5.txt
-rw-r--r-- 1 .. 3453142 Sep 1 23:05 switzegrade.tar.bzip2
226 Transfer complete
ftp> quit
221 Goodbye.
5.2. HTTP locations
The files can be downloaded also via HTTP using fetch or wget tools from the following web location:
http://unappel.ch/2/company/100830-tar-pb-mr21/data1/
In the below table the files are grouped by servers (in columns) and by partitions (in rows):
|
|
billing1 212.147.8.106 Configurator |
billing2 212.147.8.108 Billing Master |
billing3 212.147.8.109 Billing Slave (web) |
billing4 212.147.8.110 SIP Server |
|
Boot |
billing1,boot.tar.bzip2 (5.5M) |
billing2,boot.tar.bzip2 (5.5M) |
billing3,boot.tar.bzip2 (5.5M) |
billing4,boot.tar.bzip2 (5.5M) |
|
Porta |
billing1,porta.tar.bzip2 (589M) |
billing2,porta.tar.bzip2 (11M) |
billing3,porta.tar.bzip2 (596M) |
billing4,porta.tar.bzip2 (3.6M) |
|
Root #1 |
billing1,root1.tar.bzip2 (542M) |
billing2,root1.tar.bzip2 (528M) |
billing3,root1.tar.bzip2 (543M) |
billing4,root1.tar.bzip2 (527M) |
|
Root #2 |
billing1,root2.tar.bzip2 (550M) |
billing2,root2.tar.bzip2 (553M) |
billing3,root2.tar.bzip2 (552M) |
billing4,root2.tar.bzip2 (550M) |
|
Switzernet Upgrade |
switzegrade.tar.bzip2 (3.29 MB) |
switzegrade.tar.bzip2 (3.29 MB) |
switzegrade.tar.bzip2 (3.29 MB) |
switzegrade.tar.bzip2 (3.29 MB) |
The tar files are not available in the public version of this document.
5.3. Upgrade file switzegrade.tar.bzip2
The file switzegrade.tar.bzip2 (3.29MB) contains a temporary ram disk filesystem compressed in switzekerninit.gz file. This filesystem file will be placed in the root of the boot partition. It is used by the kernel at the boot time as a temporary root, before the real root is mounted. In this temporary startup filesystem, we instruct the kernel to mount the root using LABEL=switzeroot instead of referring to the device name that changes from machine to machine. Therefore the same set of files becomes compatible for different computers.
The printout below shows how to eximine the content of the ram disk filesystem. This example shows also how to re-compile the files and folders back into a new Linux Initial Ram Disk format after eventual modifications [11].
$ tar -xvf switzegrade.tar.bzip2
./
./boot/
./boot/switzekerninit.gz
./boot/grub/
./boot/grub/grub.conf
./root/
./root/etc/
./root/etc/fstab
$ cd boot
$ mkdir initrd
$ cd initrd/
$ zcat ../switzekerninit.gz | cpio -i
17007 blocks
$ cat init | grep "insmod .*cciss.ko"
insmod /lib/cciss.ko
$ cat init | grep "mkrootdev"
mkrootdev -t ext3 -o defaults,ro LABEL=switzeroot
$ ls -l lib/cciss.ko
-rw------- 1 Emin.Gabrielyan None 134296 Sep 2 18:39 lib/cciss.ko
$ find . | cpio -o -H newc > ../switzekerninit2
17007 blocks
$ gzip ../switzekerninit2
$ ls ..
grub initrd switzekerninit.gz switzekerninit2.gz
$ cd ../..
$ ls
boot root switzegrade.tar.bzip2
$
The library /lib/cciss.ko is inserted into the initial ram disk file for the compatibility with the HP E200 RAID controller.
5.3.1. The grub.conf file
The grub.conf file informs the loader to use the initial ram disk file switzekerninit.gz.
$ cat boot/grub/grub.conf
default=0
timeout=9
title MR21-2 Switzernet (c) 2010 100901,2350
root (hd0,0)
kernel /vmlinuz-2.6.18-164.0.0.0.1.el5
initrd /switzekerninit.gz
5.3.2. The /etc/fstab file of the root filesystem
The fstab file is placed in the root partitions’s /etc folder and instructs how to mount the rest of the filesystem when the control is switched from the initial ram disk to the real root partition:
$ cat root/etc/fstab
LABEL=switzeroot / ext3 defaults 1 1
LABEL=switzeporta /porta_var ext3 defaults 1 2
LABEL=switzeboot /boot ext3 defaults 1 2
…
LABEL=switzeswap swap swap defaults 0 0
6. References
Backup and restore the porta-switch installation using tar files [this document]
http://unappel.ch/2/company/100830-tar-pb-mr21/
http://www.unappel.ch/2/public/100830-tar-pb-mr21/
http://switzernet.com/2/public/100830-tar-pb-mr21/
Backup and restore the porta-switch installation using the G4L cloning tool:
http://unappel.ch/2/company/100822-g4l-pb/
http://www.unappel.ch/2/public/100822-g4l-pb/
http://switzernet.com/2/public/100822-g4l-pb/
Upgrades and rollbacks of porta-switch system:
http://portaone.com/news/news_detail.php?ID=1642
E200 RAID 1/5 controller of HP:
http://h18000.www1.hp.com/products/servers/proliantstorage/arraycontrollers/smartarraye200/
FTP on Windows XP using native IIS:
http://soswindowsfr.free.fr/sosliens/serveurftp/index.htm
Static routing for the 212.147.8.104/29 subnet:
http://switzernet.com/public/090717-vtx-pse-lan/
http://switzernet.com/2/public/100730-vtx-pse-lan/
Fedora 13 Live CD:
http://fedoraproject.org/get-fedora
G4L cloning tool:
http://sourceforge.net/projects/g4l/
The original installation disk of MR21 (without post-install and configuration):
http://unappel.ch/2/company/100811-portabilling-mr21-iso/
Linux Initial Ram Disk format (initrd):
http://www.ibm.com/developerworks/linux/library/l-initrd.html
RHEL ext3 and swap filesystem references:
http://google.ch/search?q=create+the+ext3+filesystem
http://www.redhat.com/docs/manuals/linux/RHL-7.3-Manual/ref-guide/s1-filesystem-ext3-create.html
http://www.redhat.com/docs/manuals/linux/RHL-9-Manual/custom-guide/s1-filesystem-ext3-create.html
http://www.pantz.org/software/ext3filesystem/resizeaext3fs.html
http://www.puschitz.com/TuningLinuxForOracle.shtml#CheckingSwapSpaceSizeAndUsage
http://www.redhat.com/docs/manuals/enterprise/RHEL-4-Manual/sysadmin-guide/ch-disk-storage.html
* * *
![]()
Copyright © 2010 by Switzernet