Training: MS Word field codes
=(formula) field
Created on 2010-09-22 by Sona Gabrielyan
Switzernet
Requirements
Before you start, make sure you followed the training sessions “Introduction to MS Word field codes”, MS Word Styles and MS Word style and formatting for a table
Introduction
The = (formula) calculates a number by using a mathematical formula. A formula can be inserted via Table -> Formula command (from menu) or via CTRL+F9 keyboard shortcut.
When we perform calculations in a table, we reference table cells as A1, A2, B1, B2, and so on, with the letter representing a column and the number representing a row.
|
|
A |
B |
C |
|
1 |
A1 |
B1 |
C1 |
|
2 |
A2 |
B2 |
C2 |
|
3 |
A3 |
B3 |
C3 |
\*MERGEFORMAT field switch is used when we need to apply the formatting of the previous result to the new result. This switch is usually used when merging fields from MS Excel to MS World, because otherwise, the format of the current text in the Word file dominate on the format of data merged from the Excel . If we need to preserve the formatting used in the MS Excel, we use \*MERGEFORMAT field switch. Merging data from Excel is done via Tools->Letters and Mailings->MailMerge. Figure 1 shows the function of \*MERGEFORMAT switch when data is merged from an Excel file. Here “aaa” is the title of the column that was called in the doc file. As explained above, in case of merging of Excel data into the Word document, the \*MERGEFORMAT field switch is not activated. When the text in the Word file is black, the merged data is black too, when we change font color, the merged data takes the color of the surrounding text.
![]()
![]()
Figure 1 \*MERGEFORMAT swich is not activated when data is merged from an Excel file
When the formula field is inserted via Table -> Formula command (from menu) or by pressing CTRL+F9, the \*MERGEFORMAT switch is included by default:
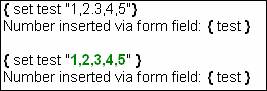
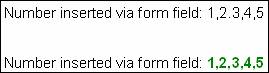
Figure 2. \*MERGEFORMAT switch is activated when the formula field is inserted via CTRL+F9
Training session
1) Define parameters with your name and validation date:
![]()
According to the explication done on \*MERGEFORMAT switch in the introduction, the formatting used while setting the value of parameter via {set} field code is merged with the value and will be applied when we will call the parameter value.
2) Create a table with a list of articles. See Figure 3
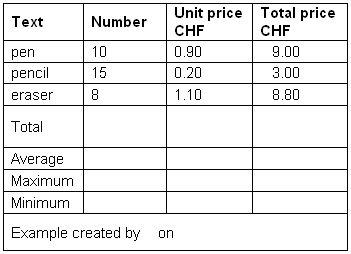
Figure 3. Table with set of articles and prices
3) we will use field codes to calculate the totals and average numbers in the table above.
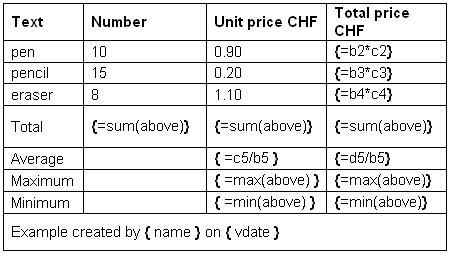
Figure 4. Field codes used to calculate totals, min, max and averages
4) update each field code by right click -> Update Field as showed in Figure 5
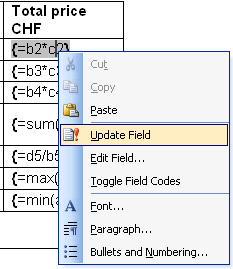
Figure 5. Update Field
5) You will see results as showed in Figure 6
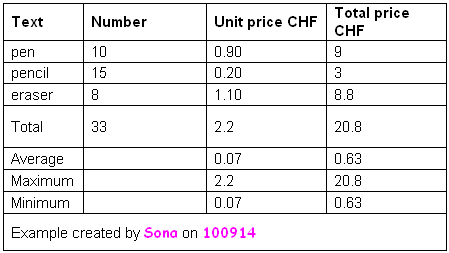
Figure 6. Results of field codes
6) in order to obtain #'## number format, we add so called numeric picture switch (\#) to the field codes. The numeric picture switch specifies how MS Word will display the numeric result of a field.
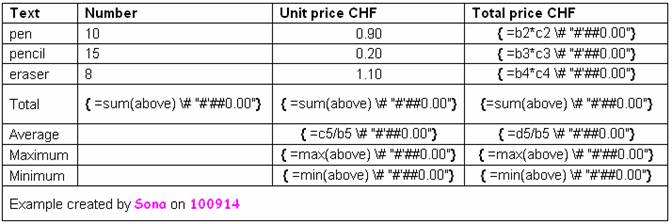
Figure 7. Numeric picture switch (#)
7) After update of each field, we will obtain the data as showed in Figure 8.
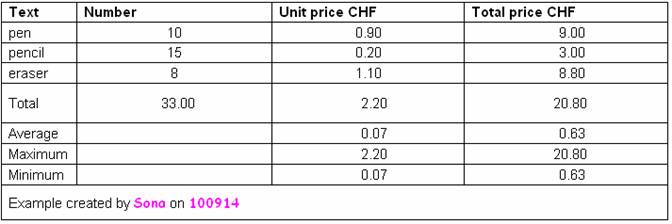
Figure 8. Results formatted using the numeric picture switch
Validation
Open a new MS Word file.
Define parameters with your name and validation date with {set} field code. Use a color other than pink for your parameters. That pink color must be a style named “field code” available in your “Styles and Formatting” pane. Refer to MS Word Styles training to learn how to define styles.
Create a new style for table, name it “articles”. Font for the whole table must be Arial, size 11. Header row must be bold. Chose a color for a header row different from black.
Take a different set of articles than those used as example in this training session. Follow the training session based on your set of articles, but using same formulas as those of training for calculate the average, minimum, maximum and totals of articles and prices.
Apply the new table style “articles” to the table with fields that you created during this training session.
Switch between Toggle Field Codes and Update Field and make prinscreens corresponding to Figure 7 and Figure 8. Make a prinscreen of your “Styles and Formatting” pane, showing the styles that you used in this document.
Copy that three prinscreens in a new word file and upload it on the training session web site, according to the guidelines. Do not upload the original word file with your formulas and tables.
References
MS Word Field Reference http://office.microsoft.com/en-us/word-help/field-codes-formula-field-HP005186218.aspx
Format (\*) field switch http://office.microsoft.com/en-us/word-help/format-field-switch-HP005186222.aspx?CTT=1
Introduction to MS Word field codes http://switzernet.com/3/support/100914-word-form-fields-introduction/
MS Word Styles: http://switzernet.com/2/support/091026-training-MS-Word-style/
MS Word style and formatting for a table: http://switzernet.com/3/support/100915-word-table-style/
Training sessions: http://www.unappel.ch/2/support/100722-training-employees/i/
* * *