Training: MS Word {if} field code. Nested statements.
Created on 2010-10-08 by Sona Gabrielyan
Switzernet
Requirements
Before you start, please make sure you followed for following training sessions:
- Introduction to MS Word field codes
- {If} field code introduction
Introduction
Using field codes within MS Word document makes it’s content “dynamic”. The results of field codes can be used in different texts of the document and on every change of the values of field codes, the contents of the texts will be changed.
The purpose of this exercise is to learn how to compose dynamic texts in MS Word document using nested {if} statements.
Additionally, during this training session we introduce a color and formatting conventions which you must apply whenever you create a document containing nested {if} statements. The main purpose of application of those conventions is to improve the visual understanding of nested {if}s. Clear visual presentation is especially useful for the cases when the same document is supposed to be used/modified by different employees.
Training session
As you know from the previous training sessions, field codes are usually invisible in the MS Word document. In order to indicate the place in the document where we define parameters using field codes, we surround them by square brackets (“[ ]”).
Figure 1 shows the “set” field codes which we use for definitions of parameters. We use pink for values of parameters.
![]()
Figure 1. Definitions of parameters
Note that the curly brackets of field codes that you can see in Figure 1 are called using CTRL+F9 and not by typing {} using the keyboard.
As you know from the previous training sessions, to visualize the field codes, we select them (from “[“ to “]“), right click on the selection, and choose Toggle Field Codes from the popup menu.
To display a parameter, we write the parameter name between the curly brackets called using CTRL+F9. See Figure 2.
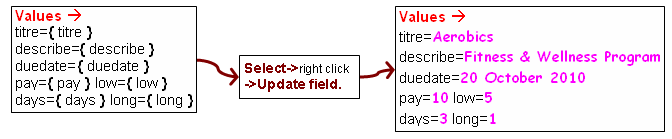
Figure 2. Display of the values of the parameters
The text variable shown in Figure 3 is created using the initial parameters shown in Figure 1. To compose the value of the text, we check the values of initial parameters using nested {if} statements.
In order to have a better visual understanding of nested {if} statements, we use the following color and formatting conventions:
· we assume that the nesting/branching level increases within {if} statement’s if-true and if-false result arguments only
· all elements of the same level share the same style (color and font size)
· the font size of the entire text of the statement decrements by 2 points as the branching level increments
· as the branching level increases a single underline style is followed by the straight double, then curved single, and then curved double underline styles
· default MS Word color pallet
order is used for representing colors of levels: ![]()
· there is a double space between the last two arguments of the {if} statement (i.e. between the results).
In the example shown in Figure 3, the first nesting/branching level is black, 16 points in size (first); the 2nd level is red, underline, 14 points (second); the 3rd is orange, double underline, 12 points (third).

Figure 3. Composed definition
The text parameter contains any text only if the value of pay isn’t zero (if pay <> 0). If pay is greater than 35, then in our text we will see the word “private” to describe the type of the aerobics training class. Otherwise, the training class type is “collective”. Then we check if long parameter is zero. If yes, then we just add the number of days in our text (the value of days parameter), otherwise, our text will show a range of days for mentioned training ({days} to {=long + days}). The same logic is applied for low parameter. The text ends by “USD/day”.
Figure 4 shows the value of text parameter, composed from the initial parameters shown in Figure 1, and using {if} statements as shown in Figure 3.
![]()
Figure 4. Value of the “text” parameter
If we change the values of initial parameters (the rates, number of days and the corresponding ranges), the changes will not apply automatically to the text parameter. To apply changes, we must update it. A parameter can be updated via select->right click on the selection->Update Field or via printing any single page of the document. This last method of update can be useful in case when the same text (or part of it) containing field result repeats several times in the same MS Word document.
While generating the text, we used \*CHARFORMAT switch (see Figure 3). This switch applies the formatting of the first letter of the field type (in our case, the field type is “set”) to the entire result. In our example, we format the set as pink and we use the \*CHARFORMAT switch. So despite the fact that we used many different colors and formatting inside the “set” field, the final text is pink (see Figure 4).
Using the parameters defined above, we can compose the dynamic text of our announcement. See Figure 5.

Figure 5. Text of an announcement containing parameters (field codes)
The results are shown in Figure 6.

Figure 6. Text of an announcement with results of field codes (pink)
Validation
You must generate your own text for announcement (e.g. announce for a scientific conference, announce for a language training sessions, etc). You must have two ranges of parameters in your announcement (e.g. “from” - “to” dates and “from” - “to” rates).
Additionally, create three other parameters: fname, lname, training_date. The value of fname is your first name, lname is your last name, and training_date is the current date. At the end of the text of announcement, add the following sentence “Created by xxx yyy, on zzz”. Where xxx is the value of the fname, yyy the value of the lname and zzz is the value of the training_date.
Make prinscreens corresponding to Figure 1 (showing the set of parameters), Figure 3 (composed definition), Figure 5 (showing the text of announcement with field codes) and Figure 6 (showing the text of announcement with results). Make a prinscreen showing the “Styles and Formatting” pane of your document. Make a prinscreen of the list of bookmarks of your document.
Open a new doc file and copy all mentioned printscreens into that new doc file (pictures corresponding to Figure 1, Figure 3, Figure 5, Figure 6, “Styles and Formatting” pane and bookmarks). The doc file with prinscreens must be uploaded on the training session web site, according to the guidelines.
References
MS Word Field Reference: http://office.microsoft.com/en-us/word-help/CH006104723.aspx?CTT=97
{if} field code reference: http://office.microsoft.com/en-us/word-help/field-codes-if-field-HP005186163.aspx
Format (\*) field switch: http://office.microsoft.com/en-us/word-help/format-field-switch-HP005186222.aspx
Introduction to MS Word field codes: http://switzernet.com/3/support/100914-word-form-fields-introduction/
{If} field code introduction: http://switzernet.com/3/support/101001-word-if-field-introduction/
MS Word Styles: http://switzernet.com/2/support/091026-training-MS-Word-style/
Training sessions: http://www.unappel.ch/2/support/100722-training-employees/i/
* * *