How to create a basic configuration over PortaSwitch
Created on 2011-12-28 by David Gómez
Switzernet
Modify the servers in the configurator
Create a new configuration profile
This document describes how to modify an initial configuration for the PortaSwitch configuration server through its web interface.
Once we have installed all the new servers, we have a blank system we must configure before to start the services. To this purpose we will use the configuration server which let us specify a role or even a set of roles to be assigned to each server.
PortaSwitch scheme
Our PortaSwitch scheme has 4 servers (configurator, sip, master, slave). The management of them is performed via the configurator server. All the servers should have a management IP address, an in our case, these IP address are included in VLAN5.
The process in charge of the management communication is the Porta-Agent, so if we want reconfigure the servers we have to edit the following file changing the IP address that this file has by the management IP address that we have assigned to this server.
/home/porta-configurator/etc/porta-agent.conf
For example if we are reconfiguring the sip server:
[root@sip1 ~]# vi /home/porta-configurator/etc/porta-agent.conf
porta_agent_ip=87.xxx.xxx.xxx
porta_agent_enable="YES"
porta_agent_script="/home/porta-configurator/bin/porta-agent.pl"
porta_agent_datadir="/porta_var/${porta_agent_ip}/porta-configurator/agent"
porta_agent_log="${porta_agent_datadir}/log/porta-agent.log"
porta_agent_sshwrapper="/home/porta-configurator/bin/rsh-wrapper.sh"
porta_agent_scpwrapper="/home/porta-configurator/bin/rcp-wrapper.sh"
[root@sip1 ~]#
When finishes editing the configuration file we must restart the service to update the changes in the system:
[root@sip1 ~]# service porta-agent restart
Modify the servers in the configurator
Before try to change any IP address in the configurator server, we should have edited the Porta-Agent configuration file. If not, we could not change the management IP address because once you set them up they became a read only field.
Once we are connected to the configurator server GUI, we can see all the servers that we have and its configuration:
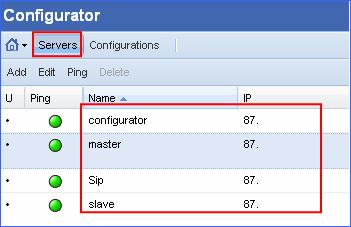
The IP address that appears besides the server is the management IP address. To change it after edit the Porta-Agent configuration file, we select a server and do double click over it.
Proceed the same way for all the servers.
Create a new configuration profile
After edit the servers, we are going to create a new configuration. Click on the configuration button and create a new profile:


Now we have created our new configuration profile. But before use it we should complete two steps.
- Add the instances
- Complete the mandatory fields
Add the instances
We are going to add the basic instances. If need more services (like Call Recording, PortaPresence,…) you have to create new instances.
The first instance that we should create is the Master DB instance. From the Configuration Tree expand DB then MySQL and finally choose Master DB. Click on Add Instance button and complete the required fields in the pop-up window.

After the Master DB instance we should create the Slave DB instance. We proceed the same way: from the Configuration Tree expand DB then MySQL and finally choose Slave DB. Click on Add Instance button and complete the name’s field and IP’s field with the proper values.
The third instance is the Radius instance. From the Configuration Tree, we select BillingEngine, click on Add Instance button and follow the same steps that we have done before.
Now we have to add the Admin instance. Select the Admin entry from the Configuration Tree and proceed as we have done for all the instances.
Finally, we add the last instance. Choose PortaSIP entry from the Configuration Tree and the environment we are going to add the instance to. Click on Add Instance button.

Complete the mandatory fields
We have created all the instances that we need. If we click on Check/Apply button to use the new configuration profile, we will get the following message:
This is because some instances that we have created contain some fields that are mandatory so we have to complete them with the right information.
As we can see in the picture above, the instances that have mandatory fields are:
- PortaSIP instance
- Admin instance
- Radius instance
As soon as we have completed the mandatory fields, we can check and apply the profile to use it.
We complete the mandatory fields as follow:
- CANONIC_NAME à xxxx.switzernet.com
- RAD_KEY à xxxx
- admin_server_name à xxxx.switzernet.com
- maintainer à admin@test.com
Check the servers
At this point, the new configuration profile that we have created is active and the servers should work fine with it. To check their status, first of all we have to be sure that our new profile is active (check it on the Configurations window) and then we can check the status of the servers (check it on the Servers window).

As we can see in the figure above, once you have applied the new profile configuration, the servers should load it. This action takes some time, so we have to wait until all the servers are ready (green light state).
Check the services
When we have checked the profile and server status, last step is to test if the whole system works properly. In order to do it we configured an account and make some calls to prove that the xDRs work fine.