ASTPP installation and configuration
By Yevgeniya Suminova on 2021-03-29
Updated by Yevgeniya Suminova on 2021-03-31
Updated by Yevgeniya Suminova on 2021-04-07
Updated
by Yevgeniya Suminova on 2021-05-12
Updated
by Yevgeniya Suminova on 2021-07-11
Contents
2. Configure ASTPP from web admin GUI
4. Remove default useless data
Introduction
This document contains the detailed instructions how ASTPP server has to be installed and configured in order to prepare it for the migration of the customers.
1. Install ASTPP
In order to install ASTPP, this document must be followed from The beginning till the end: https://docs.switzernet.com/3/public/210311-astpp-instalation/
2. Configure ASTPP from web admin GUI
At this point you already have the ASTPP server installed, and you could enter into admin control panel on https://yoursubdomain.com
You will be invited to change the admin password. Click on “HERE”
![]()
2.1. Edit admin
A. Change “Password” and save it
B. Change the “Email” to contact@4z.com
C. Change “Notification Email” to contact@4z.com
D. Change “Country” to Switzerland
E. Change “Timezone” to (GMT+01:00) Amsterdam, Berlin…..
F. Change “Currency” to Swiss Franc (CHF)
G. Hit “Save”
2.2. Set Localization
A. Go to “Switch” -> “Localizations”
B. Hit “Create”
C. Name = “4z”
D.
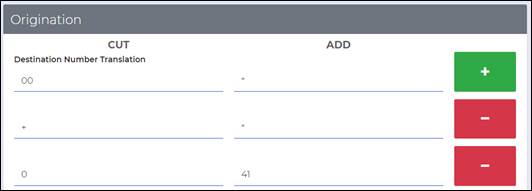
In “Origination” -> “Destination Number
Translation” -> hit ![]() twice.
twice.
E. Set rules as following:
00 *
+ *
0 41
Attention! Respect the order!
F. In “Inbound Callerid Translation” set the following:
00 *
+ *

G. Hit “Save”
2.3. Company Profiles
A. Go to “Configuration” -> “Company Profiles”
B. Click on “5196284617” and remove/change all data
C. Set something like 1@1.com as email. Change the name, etc.. All data that has nothing to do with 4z should be removed or changed if not possible to remove.
![]()
D. Click on “iNextrix Technologies….”
E. “Company” = 4z.com Sàrl
F. “Address1” = Case Postale 32
G. “City” = Lausanne
H. “Province” = Switzerland
I. “Country” = Switzerland
J. “Zip Code” = CH-1015
K. “Phone” = +4122 550 5500
L. “Fax” = +4144 355 30 61
M. “Email” = contact@4z.com
N. “Website” = www.4z.com
O. “Company Tax Number” = CHE-481.651.516
P. “Invoice Notification” = yes
Q. “Invoice Due Notification” = yes
R. “Invoice Due Days” = 25
S. “Notify before due days” = 2
T. “Invoice Prefix” = INV_-
U. “Invoice Start From” = 1001
V. “Generate Invoice For No Usage” = yes
W. “Invoice note” = Invoice from 4z.com
X. Domain = http://51.222.107.119:8019/ (change the IP accordingly)
Y. “Header” = 4z.com
Z. “Footer” = 4z.com
CC. Hit “Save”
Note: With 4z.com logo, invoices do not generate. It is a limitation of the free version
2.4. Settings
Co to “Configuration” -> “Settings” -> Choose Fields on the left menu one by one:
2.4.1. Global
A. Change “Minimum fund transfer” to 10
B. Change “Password Strength” to “Moderate”
C. “Number of Default Rows” = 100
D. “Base Currency” = Swiss Franc
E. “Default Invoice Mode” = Draft
F. “Account number Editable” = Yes
G. Hit “Save”
2.4.2. Calls
Only change DID localization and set 4z, the rest leave as it is
2.4.3. Homer
Leave as it is
2.4.4. Opensips
Leave as it is
2.4.5. Payment Methods
To add instructions here when payments will be allowed for customers
2.4.6. Purge
A. Recording Files Older Than Days * = 30
B. Audit Logs Older Than Days * = 180
C. CDRs Older Than Days * = 3650
D. Emails Older Than Days * = 3650
E. Invoices Older Than Days * = 3650
F. Expired Accounts After Days * = 365
G. Deleted Accounts After Days * = 365
2.4.7. Signup
This section must further be updated. We must understand how setting here influence Customer’s Signups.
A. Starting Digit * = 41
B. Card Length * = 10
C. Pin Length * = 6
D. Timezone * = (GMT +01:00) Amsterdam, Berlin, …
E. Country * = Switzerland
F. Rate Group * = default (will be changed afterwards)
G. Enable Signup * = Disable (will be changed afterwards)
H. Create SIP Device * = Enable
I. Initial Balance * = 0.5
J. Default Tax * = --Select--
K. Account Notification * = Enable
L. Payment Gateway Permission * = Enable
M. Generate Pin * = Yes
N. CPS * = 1
O. Concurrent Calls * = 1
P. LC Charge / Min * = 0
Q. Allow Recording * = No
R. Allow IP Management * = No
S. Allow Local Calls * = Yes
T. Email Alerts ? * = Yes
U. Account Valid Days * = 36500
V. Localization * = 4z
W. Balance Below * = 5
X. Allow Max Retries * = 10
Y. Telephone as account number * = No
Z. Account Verification By * = Email
AA. Generate Invoice *= Yes
BB. OTP Expire Time(min) * = 10
2.4.8. Database
Leave as it is
2.4.9. Notifications
For now leave disabled. When moment comes to send emails to customers follow the steps below.
A. Email notifications = Enable
B. SMTP = Enable
C. SMTP Host * = smtp.switzernet.com
D. SMTP Port * = 587
E. SMTP User * = username@smtp.switzernet.com
F. SMTP Pass * XXXXXXXX
G. Mail Log * = /var/log/astpp/
3. Get Addons
A. Go to “Dashboard” -> “Get Addons”
B. Install following Addons:
a. Account Number Range -> Re-login
b. Switch Monitoring -> Re-login
C. Go to “Configuration” -> “Settings” -> “Global”
D. Set “Auto refresh page” to 15
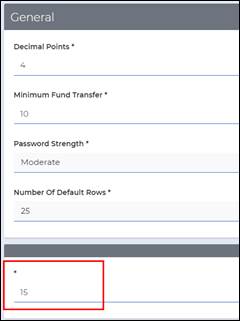
E. Hit “Save”
F. On the left Menu, go to “Account”
G. Set “Minimum” to 41000000000
H. Set “Maximum to 41999999999
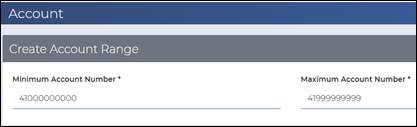
I. Hit “Save”
4. Remove default useless data
Go to “Accounts” => “Customers” => “SIP devices” and delete all
Go to “Customers” and delete all
Delete all from Resellers
Go to “Tariffs” => “Rate Groups”
· Here keep default rate group
· Delete the rest
Go to “Gateways” and delete all
Delete all from “Trunks” and “Termination rates”
5. Proceed further
Next processes contain sensitive information and are not published publicly.
From this point 4z.com team must follow this document
End
***
© 4z.com