Astrad server installation/migration procedure
Edited on 160608 by Nicolas Bondier
Edited on 130128 by Nicolas Bondier
Edited on 120913 by André Guimarães
Edited on 120821 by Nicolas Bondier
Created on 111005 by André Guimarães
Switzernet
0- Pre-configuration
Install a new server Debian Jessie 8 64 bits. For this installation we’ll choose as base Debian Linux 8.4 Jessie 64 bits. The Astrad module in puppet, has a Readme file that should be more up to date. Refer to it.
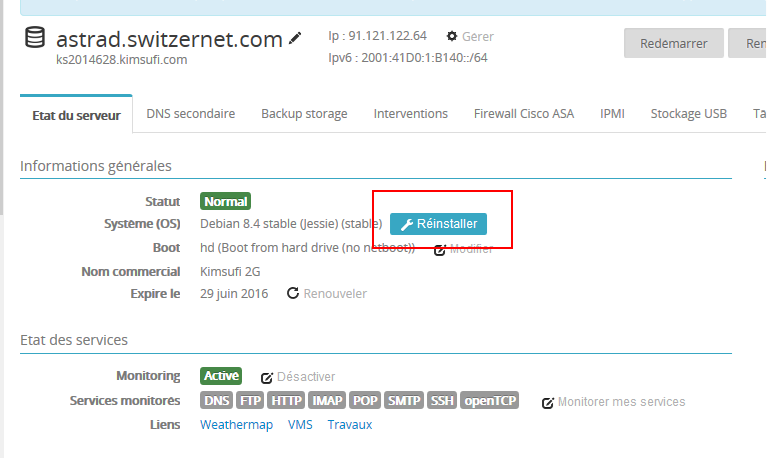
Go to the OVH interface to install or reinstall the server. In this example, we will reinstall astrad.switzernet.com
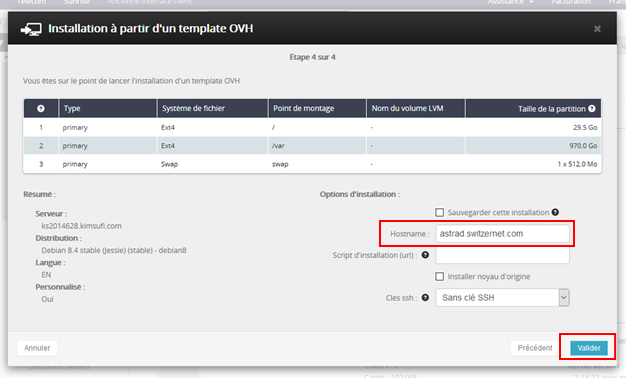
We need a custom partition configuration:
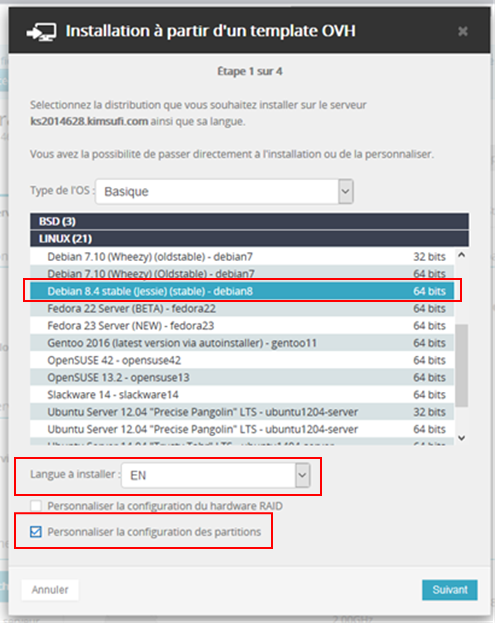
Resize the partitions. /var must be the biggest partition and not /home as proposed. Fill the disk. Keep quite enough space for the root / partition. Here we have 25.5 GB for / and 970GB for /var.
![]()
![]()
![]()
![]()
![[SCM]actwin,0,0,0,0;https://www.ovh.com/manager/dedicated/index.html?csid=h7bt4#/configuration/server/ks2014628.kimsufi.com?tab=DASHBOARD
Votre espace client D餩頏VH - Mozilla Firefox
firefox
2016-05-24 , 17:20:59](index5_files/image006.png)
If this is a new Astrad and not a reinstallation, find a free Astrad FQDN using the command in your Cygwin (it can take few seconds):
newfqdn=`for m in {0..30};
do
m=$(echo $m | sed -r 's/0//g')
nslookup astrad$m.switzernet.com|grep "t find "|grep -oE "astrad.*com";
done|head -n1`; echo $newfqdn;
Enter the Astrad hostname:
![[SCM]actwin,0,0,0,0;https://www.ovh.com/manager/dedicated/index.html?csid=h7bt4#/configuration/server/ks2014628.kimsufi.com?tab=DASHBOARD
Votre espace client D餩頏VH - Mozilla Firefox
firefox
2016-05-24 , 17:21:41](index5_files/image008.png)
0.1- Connect to the server.
Access the new server by SSH as root using the password sent by email in company@switzernet.com.
![[SCM]actwin,0,0,0,0;Courrier entrant - @company - Mozilla Thunderbird
thunderbird
2016-06-08 , 13:12:15](index5_files/image009.png)
$ ssh root@astradX.switzernet.com
Note: If you already have connected to this
server with SSH, you will have this message:![[SCM]actwin,1,-284,1534,678;~
mintty
2016-06-08 , 13:10:54](index5_files/image010.png)
In that case, you need to remove the server from you Cygwin’s ~/.ssh/known_hosts with the following command and retry to connect:
$ ssh-keygen.exe -R astrad.switzernet.com
0.2- Change the root password
Once connected to the astrad server, type the command passwd root to modify its password. Replace password by the desired password (Use a very long one and save it in a safe place, where we usually store passwords).
root@astradX:~# passwd
Enter new UNIX password: password
Retype new UNIX password: password
passwd: password updated successfully
1- Pre-Installation
0.3- Authorize new server to make calls
If this server is new only and its IP address has not been added to the list of nodes in porta-billing and in vendor’s gateways.
Follow the procedure described in the following doc if you’re installing a new server:
http://switzernet.com/1/company/100512-insert-new-node/
0.4- DB servers
In case of a new server, in each of the DB servers execute the following lines in MySQL (login as root) replacing IPADDRESS by the new server’s IP address:
GRANT PROCESS, FILE, SUPER, REPLICATION CLIENT, REPLICATION SLAVE, RELOAD,LOCK TABLES ON *.* TO 'astrob'@'IPADDRESS' IDENTIFIED BY '';
GRANT all privileges ON astrad.* TO 'astrob'@'IPADDRESS' IDENTIFIED BY '';
GRANT all privileges ON asterisk.* TO 'astrob'@'IPADDRESS' IDENTIFIED BY '';
FLUSH PRIVILEGES;
0.5- Master server
This section is to do if it is a new server.
In the master server master.switzernet.com, add the following lines in MySQL (login as root) replacing IPADDRESS and MYSQL_PASSWORD by the new server’s IP address and the good password:
INSERT INTO mysql.user (Host,User,Password) VALUES('IPADDRESS','ast-robot',PASSWORD('MYSQL_PASSWORD'));
FLUSH PRIVILEGES;
GRANT ALL PRIVILEGES ON `porta-sip`.active_nodes TO `ast-robot`@IPADDRESS IDENTIFIED BY 'MYSQL_PASSWORD';
GRANT SELECT ON `porta-sip`.location TO `ast-robot`@IPADDRESS IDENTIFIED BY 'MYSQL_PASSWORD';
FLUSH PRIVILEGES;
0.6- PBS
This section is to do if it is a new server.
In each PBS server add the following lines in mysql (login as root) replacing IPADDRESS and MYSQL_PASSWORD by the new server’s IP address and the good password:
INSERT INTO mysql.user (Host,User,Password) VALUES('IPADDRESS','ast-robot',PASSWORD('MYSQL_PASSWORD'));
FLUSH PRIVILEGES;
GRANT SELECT ON `porta-billing`.* TO `ast-robot`@IPADDRESS IDENTIFIED BY 'MYSQL_PASSWORD';
FLUSH PRIVILEGES;
0.7- DNS
This section is to do if it is a new server.

If the DNS configuration is broken, it may result of the disconnection of all customers. This will not be immediate.
$ ssh root@ns1.switzernet.com
Create an entry in DNS for astradX.switzernet.com, frY.youroute.net and sipZ.youroute.net in server ns1.switzernet.com. Change serial value YYYYMMDD to the current date and increment NN with the daily version. (01, 02 …).
Add the lines in blue changing the values on the example to the new hostname of the server. Replace astradX by the name of your new server, SERVERIP by its IP address, frY by the last fr name in the file incremented by one and sipZ by the last sip name incremented by one. Reload bind and try to ping the new server by each of its new names.
root@ns1:~# nano /var/cache/bind/db.switzernet.com
; The $TTL directive at the top of the zone file (before the SOA)
; gives a default TTL for every RR without a specific TTL set.
$TTL 3600
switzernet.com. IN SOA ns1.switzernet.com. hostmaster (
YYYYMMDDNN ; Serial
30 ; Refresh
30M ; Retry
1W ; Expiry
3H ; Minimum
)
...
astradX IN A SERVERIP
...
root@ns1:~# nano /var/cache/bind/db.youroute.net
youroute.net. IN SOA ns1.youroute.net. hostmaster.switzernet.com. (
YYYYMMDDNN ; Serial
1D ; Refresh
30M ; Retry
1W ; Expiry
1H ; Minimum
)
...
frY IN CNAME astradX.switzernet.com.
…
sipZ IN CNAME frY
root@ns1:~# /etc/init.d/bind9 restart
root@ns1:~# ping astradX.switzernet.com -c4
root@ns1:~# ping frY.youroute.net -c4
root@ns1:~# ping sipZ.youroute.net -c4
If everything works, run the script /root/copy_zone_db_to_ns2.sh to update ns2.switzernet.com
root@ns1:~# /root/copy_zone_db_to_ns2.sh
0.8- Reverse DNS
First you need to add the server hostname in ns1.switzernet.com and ns2.switzernet.com if this is a new server.
In OVH manager, replace the name of the server by its astradX name in Dedicated servers > Services > Reverse IPV4:
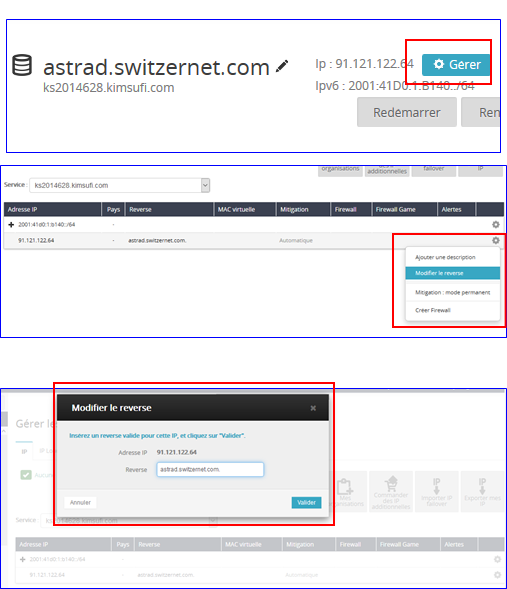
If it fails, it means you have not well configured the DNS!
2- Installation
At this point DNS and reverse DNS should be already working. Your new server must answer to pings to all its names.
You need to have 2 SSH connections opened. One on the astradX.switzernet.com server and one on the puppet2.switzernet.com server.
Open a new Cygwin terminal and run:
$ ssh root@puppet2.switzernet.com
If this a server reinstallation you need to run the following line as root on the Puppet Master server (puppet2.switzernet.com), replacing X by the new server number:
root@puppet2:~# puppet cert --clean astradX.switzernet.com
In /etc/puppet/manifests/nodes.pp create a new node for the server if it doesn’t exists and change the values of each variable as needed.
If this is a reinstallation, you don’t need to change the variable, except uncomment $reloadfail2ban, $installastrad16, $reloadastrad16.
Else you must set the following variables:
- SERVER_ID is a unique id for MySQL replication. Look at all other servers in the file to set a unique one.
- MYSQL_PASSWORD must be the same as other Astrad servers.
- MASTER_IP must be the same as other Astrad servers.
- OLD_MASTER_IP must be the same as other Astrad servers.
· DBA_IP the DBA IP address the Astrad server must replicates it database from.
nano /etc/puppet/manifests/nodes.pp
…
node "astrad16.switzernet.com" {
…
}
…
node "astradX.switzernet.com" {
$server_id = SERVER_ID
$mysql_ast_user = "root"
$mysql_ast_pass = "MYSQL_PASSWORD"
# $sipport = 5070
$reloadfail2ban = 1
$installastrad16 = 1
$reloadastrad16 = 1
$masterip = "MASTER_IP" # Master-MR24
$masterip2 = "OLD_MASTER_IP" # Old Master
$db3_host_ip = "DBA_IP"
$astrad_version = "Astrad016"
include astrad
}
…
To install puppet in the new Astrad server. Execute the following commands:
root@astradX:~# apt-get update
root@astradX:~# apt-get install -y puppet
In /etc/puppet/puppet.conf, add the puppet server host:
root@astradX:~# nano /etc/puppet/puppet.conf
![[SCM]actwin,0,0,845,442;~
mintty
2016-05-24 , 18:50:07](index5_files/image013.png)
And save.
Or more quickly with:
root@astradX:~# sed -i "/postrun_command/aserver=puppet2.switzernet.com" /etc/puppet/puppet.conf
Still on the Astrad server do:
root@astradX:~# puppet agent --enable
root@astradX:~# puppet agent --test --no-daemonize
If you see the following:
![[SCM]actwin,4,-622,1241,260;~
mintty
2016-05-24 , 18:59:32](index5_files/image014.png)
It means you must delete the certificate first on astradX.switzernet.com and retry the puppet:
find /var/lib/puppet/ssl -name astrad.switzernet.com.pem -delete
puppet agent --test --no-daemonize
If it worked, you should see something like:
![[SCM]actwin,4,-701,1241,181;~
mintty
2016-05-24 , 19:10:35](index5_files/image015.png)
On to the Puppet Master. Verify if you can ping the new server by name and run the following commands (replacing X by the new server number). If the server does not respond to pings verify DNS configurations.
root@puppet2:~# ping astradX.switzernet. com -c4
![[SCM]actwin,2,-754,1535,208;root@puppet2:~
mintty
2016-06-08 , 14:16:08](index5_files/image016.png)
Still on the puppet server, list pending certificates:
root@puppet2:~# puppet cert list
![[SCM]actwin,2,-908,1535,54;root@puppet2:~
mintty
2016-06-08 , 14:17:29](index5_files/image017.png)
And sign it:
root@puppet2:~# puppet cert --sign astradX.switzernet.com
![[SCM]actwin,0,-895,1533,67;root@puppet2:~
mintty
2016-06-08 , 14:18:50](index5_files/image018.png)
On the new Astrad server execute (You may try twice, the first will fail):
root@astradX:~# puppet agent --test --no-daemonize
The installation takes several minutes. Do not interrupt it. Here is a working example. The first red lines are normal.
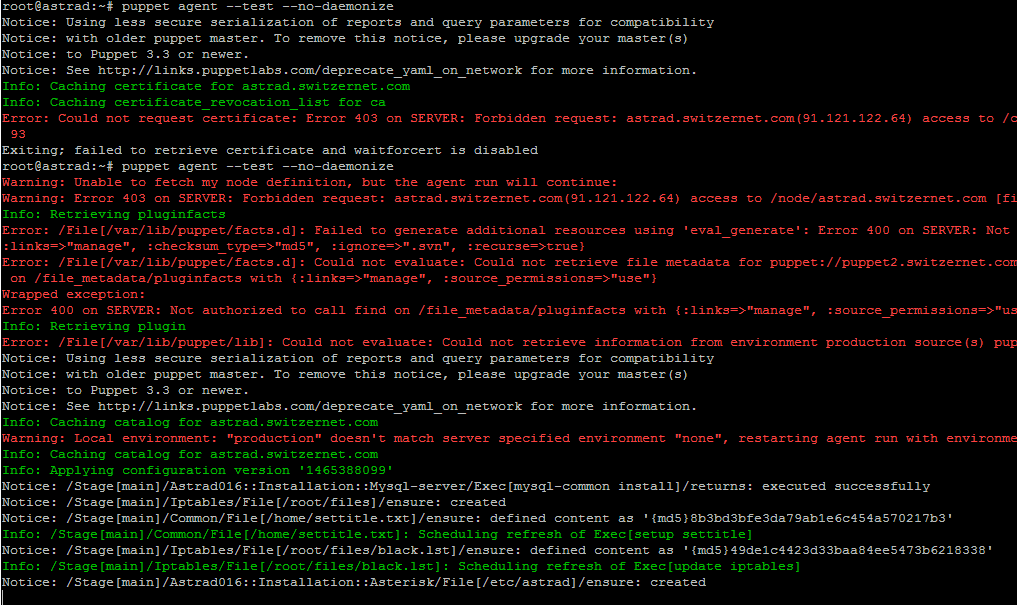
After executing the first command Puppet will install and configure all needed services.
If errors happens, try to find what the problem in the log is.
At the end of the installation, you should see:
![[SCM]actwin,0,-688,1533,274;~
mintty
2016-06-08 , 14:43:29](index5_files/image020.png)
Check the status of the server with:
root@astradX:~# /etc/init.d/astrad status
![[SCM]actwin,0,0,0,0;~
mintty
2016-06-08 , 16:26:04](index5_files/image021.png)
If everything completed well, comment the lines in yellow:
root@puppet2:~# nano /etc/puppet/manifests/nodes.pp
node "astrad16.switzernet.com" {
…
}
…
node "astradX.switzernet.com" {
$server_id = SERVER_ID
$mysql_ast_user = "root"
$mysql_ast_pass = "MYSQL_PASSWORD"
# $sipport = 5070
# $reloadfail2ban = 1
# $installastrad16 = 1
# $reloadastrad16 = 1
$masterip = "MASTER_IP" # Master-MR24
$masterip2 = "OLD_MASTER_IP" # Old Master
$db3_host_ip = "DBA_IP"
$astrad_version = "Astrad016"
include astrad
}
…
You can now try to register with you sip phone on this server and make and receive calls from and to your phone. From PSTN and to PSTN. Etc…
3- Monitoring
Add the server to monitoring list
Log in to http://monitor.switzernet.com/cacti and follow the procedure described in 2.3 and 3.6 of the following document:
http://switzernet.com/public/100510-cacti-monitoring/
Follow the procedure in:
http://ftp.switzernet.com/3/support/110419-cacti-graph-page-manual/
to add the graphs to:
http://monitor.switzernet.com/view_graphs_list.php
To add the synchronization status between the new server and its DB server, edit /root/folders/110726-check-replication/check-rep.conf and add the new server to the correct STARX group (the group containing the DB server where the Astrad is synchronizing). Verify if in this web page appears a new line with the DBX->AstradYY (It may take 30 minutes to appear):
http://switzernet.com/3/public/110727-normality-monitoring/
4- Control telephone
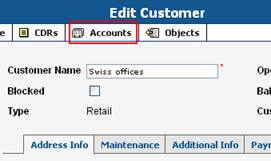
Register a telephone in the new astrad server. This phone should be registered in this server at all times. It should be configured to register each 180 seconds. To create the account to this phone:
- access:
https://www.intarnetinc.com/customer.html
- search for Swiss Offices and click on its name once found:

- click on accounts
- add a new account (use one of the existing ones as example)
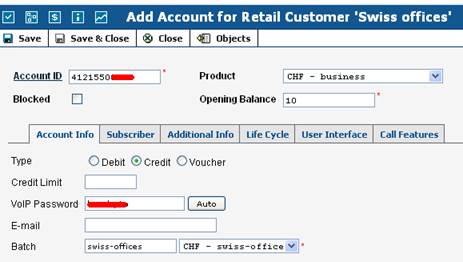
- configure this new account in the telephone
- configure also the account 41215504524 in the telephone
5- Tests
Follow the test procedure in section 5 of (ignore tests 1 and 9):
http://ftp.switzernet.com/3/public/110411-astrad-test-case
6- Server Migration
After having tested the server and if there are not any problems, you can start to change the users from the previous server to the new one.
Create a SQL with all the customers registered in the older server by following the instructions in section ‘Importing the customer list to a BD’ in:
http://ftp.switzernet.com/3/public/110930-new-voting-poll/
Change the SIP alias from the old server to the new one.
Follow the full procedure describe in the above link.
7- Resources
http://switzernet.com/public/100520-install-asterisk/
http://www.voip-info.org/wiki/view/PortaOne+Radius+auth
http://switzernet.com/2/public/100719-asterisk-update/
http://switzernet.com/public/100510-cacti-monitoring/
http://switzernet.com/company/091229-asterisk-codecs/
http://switzernet.com/company/100105-codecs-transcoding/
http://switzernet.com/company/091208-asterisk-radius/
http://switzernet.com/company/100512-insert-new-node
http://switzernet.com/3/public/110302-test-asterisk-mysql/
http://switzernet.com/3/public/110724-astrad-V8/
http://switzernet.com/3/public/110126-astrad-versions/
http://switzernet.com/3/public/110216-fail2ban-asterisk/
http://switzernet.com/3/public/110525-puppet-modules/
http://ftp.switzernet.com/3/public/110411-astrad-test-case/
http://ftp.switzernet.com/3/company/110309-astrad-files-backup/
http://ftp.switzernet.com/3/public/110930-new-voting-poll/
http://switzernet.com/company/090324-portasip-ovh-clone/
http://switzernet.com/company/090806-modify-sip-server-subscription/
http://switzernet.com/company/090415-portasip-cli-force/
http://ftp.switzernet.com/company/091221-switzernet-dns/
http://ftp.switzernet.com/3/public/111031-astrad-stat/